Wondering how to use OBS virtual camera? If so, you’ve found the right place.
When live streaming, video calling, or participating in virtual meetings and conferences, using an OBS studio virtual camera is a great way to get creative with your webcam feed.
If you’re not sure how to use an OBS virtual camera, this guide will go over all you need to know.
What is An OBS Virtual Camera?
So, what is an OBS virtual camera? The virtual camera in OBS is essentially a virtual camera tool that can be used to replace your webcam feed in applications like Zoom, Skype, Google Meet, and more, as the name implies. A program for recording and editing videos, OBS Studio, contains it.
You can use a variety of media, including images and videos, as the camera output in these kinds of apps thanks to the OBS virtual cam plugin.
By using OBS virtual camera, for instance, when starting a Skype call with a friend, you can show them alternative content in place of your standard webcam, such as videos or even a live feed of your screen.
Additionally, it can be used to display your webcam with additional filters and enhancements. The OBS virtual camera download has many applications.
How to Use OBS Virtual Camera on Windows/Mac?

Using virtual cameras from OBS has benefits like making green screens, etc. Both PCs and Macs can use it.
Guide on Applying Virtual Camera for OBS on Windows
Use an OBS camera in video conferencing software to create a picture-in-picture effect, if you wish. Being able to add effects and filters to the video is a benefit of using OBS as a virtual webcam.
Additionally, OBS enables webcam optimization features like focus, zoom, and exposure. In general, it can improve the caliber of your videos.
Here is a list of steps on adding the OBS webcam:
Step 1. The first thing you must do is update OBS to the most recent version. Hit “Help” > “Check For Updates”.
Step 2. Open OBS, and hit the “+” button from the Sources dock. Choose “Display Capture” > “Create New” > “OK”. The screen can be used to create the picture-in-picture effect in other video meeting software in this instance.
Step 3. The dock is located on the bottom side. Click it to launch the virtual camera. Then click “Start Virtual Camera”.
Previously, you had to download a plugin to use this feature; now, you can enable it right from the home screen.
Tutorial on Using OBS Virtual Webcam on Mac
Thankfully, the virtual camera is operational on the macOS version of OBS 26.1, which is the most recent version.
In order to set up the plugin, you don’t have to perform any difficult steps. You can use it with programs like Skype, Webex, etc., similarly to the Windows version. Locate and select the webcam in virtual status from the bottom toolbar.
System Requirement: For macOS Big Sur, this application has been thoroughly tested.
Read More: How to Use Fujifilm Disposable Camera?
How to Use OBS Virtual Camera on Zoom Meeting
There won’t be a need to download the OBS-VirtualCam plugin following the update of OBS in 2021. You are permitted to add a webcam source to set a specific scene for participants in Zoom meetings. When sharing slides with pictures inside pictures, it is especially helpful.
Additionally, it’s possible to optimize the camera settings. The same procedure applies to other streaming applications like Discord, Skype, Microsoft Teams, and Webex Meetings.
Guide on using OBS Studio in a Zoom Meeting with Virtual Cam:
Step 1. If you already have OBS installed, download it from the official website to get the most recent version. If you want to use the virtual camera, stop using other programs.
Step 2. Open OBS Studio and click “Start Virtual Camera” after adding sources like images to it.
Start Zoom meeting and hit “Settings” > “Video”. From the Camera option, choose “OBS Virtual Camera”. You can see how the Zoom meeting reflects your OBS here.
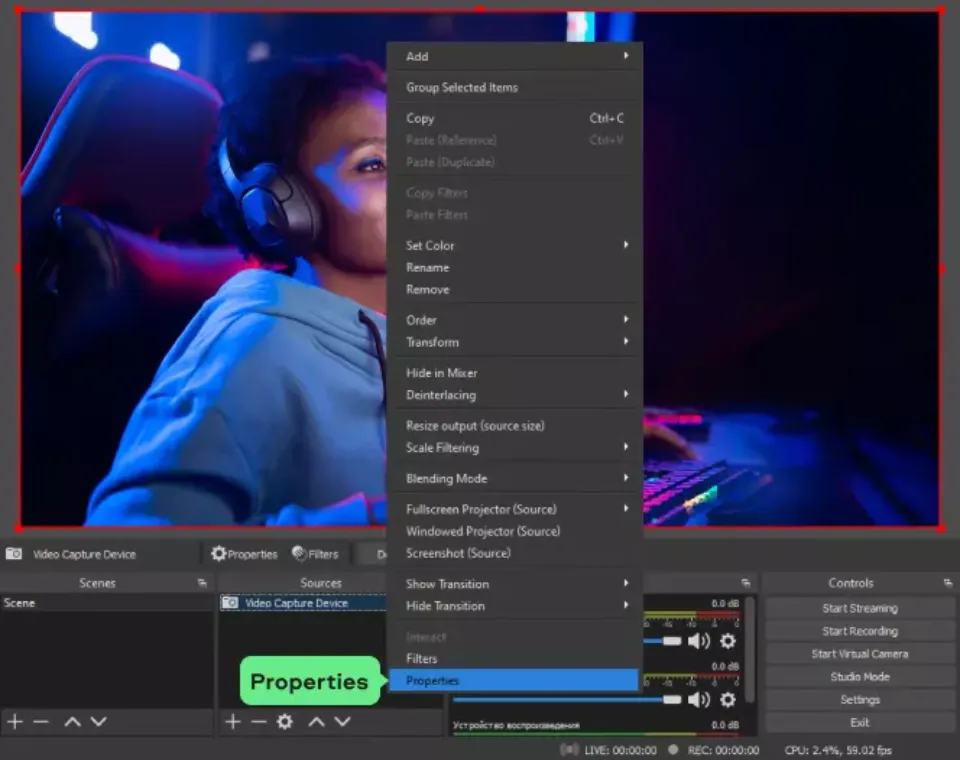
Step 3. To adjust the camera for the best settings, right-click “Sources” and choose “Properties”.
Step 4. Application of advanced settings will improve the webcam’s appearance. Change the zoom, focus, and exposure settings from the new window. After that, hit “OK” and go back to your video call software.
Troubleshooting
If there’s an issue of OBS virtual camera not working properly or not showing up at all, we recommend trying one of the solutions below:
- Restart OBS. Restarting the computer or the program is the easiest and most straightforward fix. You might also try disabling your antivirus program, as it might be blocking the video feed.
- Adjust the video settings. Under the Output tab of the Settings window you can change video format, FPS, and resolution.
- Replace or upgrade the camera driver. Obtain the most recent webcam driver by visiting the manufacturer’s official website.
- Check OBS updates. Go to the Help tab at the menu bar and click Check For Updates. If the update is available, install it by clicking Update Now.
Summary: How to Use Obs Virtual Camera
There are lots of ways you can use the OBS virtual camera to take your the level of online calling services like Zoom, Skype, and others.
We hope that this guide has given you the advice and instructions you need to maximize this function in your preferred online calling program.