knowing how to take film out of disposable camera can be a handy skill, whether you want to know if you can take out and develop the film inside, or loading a new film and use the camera.
To save on shipping costs, you can remove the film canister from the disposable camera before mailing it in. All disposable cameras are slightly different, but the process of removing the film is similar between each type.
Here is a quick tutorial showing you step-by-step how to remove the film from your disposable camera.
How to Take Film Out of Disposable Camera? 5 Steps
If you want to know how to take out a film from a disposable camera, here are the steps:
- Step 1: Remove the Label/wrapper
- Step 2: Locate and Pry Open the Tabs Holding the Camera Together
- Step 3: Remove the Film
- Step 5: What Do I Do With the Camera?
Step 1: Remove the Label/wrapper
It’s just a regular plastic camera, the disposable one. Every business brands the cameras with its logo using an adhesive label or a flimsy card stock-style wrapper. Typically, in order to disassemble the camera, the label must be removed.
It usually doesn’t matter if it gets torn or damaged because it is simple to do. The label can simply be left on some cameras, like the one in the pictures, because it doesn’t really wrap around or cause interference.
Step 2: Locate and Pry Open the Tabs Holding the Camera Together
These tabs are typically found on the camera’s sides. You only need to pry on the right side of the camera—the side with the film advance—if all you want to do is remove the film.
In a way similar to a built-in film door, almost all cameras are made to break easily. Reusing the camera is impossible because doing so will only result in the camera being completely destroyed. However, the majority of disposable cameras will have tabs on both sides so you can pry up and remove the entire back. Other small tabs of various kinds are typically present along the top and bottom that serve only to keep the back in position and moderately tight; they may need a little pressure or prying to be released.
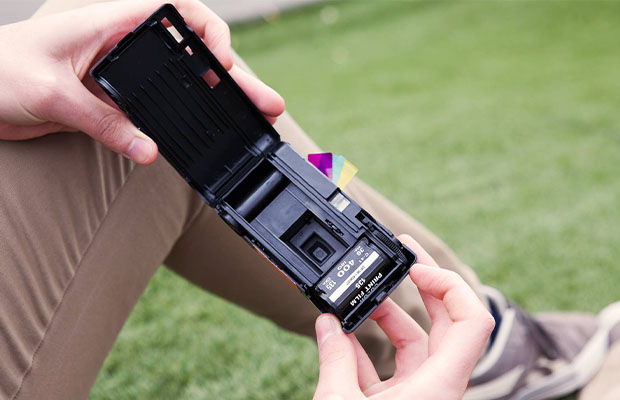
Step 3: Remove the Film
I don’t have much to say at this point. It simply displaces itself. This 35mm film is just like any other 35mm film in that it is self-contained in the tiny 35mm film cartridge.
Step 4: Remove the Battery

These cameras typically use an AA or AAA battery and have a flash. You hardly depleted any energy from this battery during the 27 exposures you used. Use it elsewhere by removing it! When the TV remote dies, you realize that you never have batteries on hand!
On a related note, you cannot access the battery if you did not completely remove the camera’s back.
Step 5: What Do I Do With the Camera?
You have a few choices. It is possible to recycle some of the components if you can separate them. I actually put my disposable cameras back together, leave the battery in them and let my kids have them. They adore acting out taking pictures like their dad! It’s an inexpensive, entertaining toy. You could also simply discard it. After all, they were designed to be thrown away.
Should You Rewind before Opening Your Camera?
Nearly all 35mm cameras now demand that the film be rewound. The only opening in the camera is in the back, which is light-sealed to keep the take-up spool from being exposed to light.
As a result, exposing the film on the take-up spool to too much light before rewinding puts it at risk of being damaged, even for a brief period of time. No matter how fast you shut the camera’s back cover after opening it, at least five or six shots will be missed.
When processed negatives appear murky or foggy, they are referred to as “fogging”. You must take out the previous film cartridge containing the exposed film and rewind the last roll into it before loading a new one.
For more information, read our post on Best Disposable Camera.
How to Tell Whether a Camera Film is Used?
There are typically two ways to determine whether the camera film has been used, and this requires visual inspection. The initial strategy entails looking for the film leader sticking out of the film canister.
It has undoubtedly been used if there is no film protruding from it. If there is film sticking out, the second method entails looking at the film leader for any markings, bends, or folds that would indicate that the film has been used and has been put through a camera. Search for the four numbers on the top or bottom of the canister if you are working with an APS 35mm film. If the number 3 has a white “x” beside it, this means the film has been exposed and is available for development.
Check to see if the word “exposed” is apparent on 120 or 220 film or medium format. If this is the case, the movie has definitely been used.
There is beauty in film photography, even though digital photography is simply simpler and requires less time and money for supplies. Avoiding errors will help you preserve your photos and prevent loss or destruction of them if you’re interested in shooting film. The best place to start is by becoming knowledgeable about proper film unloading.
Related Post:
- Can Disposable Camera Go Through Airport Security?
- How to Get Disposable Camera Pictures on Your Phone?
- How to Put on a Camera Strap?
- How to Develop Disposable Cameras?
- How to Use Fujifilm Disposable Camera?
- Do Disposable Cameras Expire?
FAQs about Disposable Camera
How to Develop Disposable Camera Film?
Simply bring your film or disposable cameras to your local CVS location and drop it off.
Can You Change the Film on a Disposable Camera?
Despite the fact that the most are “single-use” only, they can be disassembled and recharged with film and a battery.
How Long Can You Leave Film in a Disposable Camera?
Most exposed films need to be developed within 6 months of shooting. Your images will start to degrade after about six months.